
Transferring a domain name between registrars can be a simple process if you follow the right steps. Whether you are looking to move your domain to a new registrar for better services, pricing, or customer support, this guide will help you navigate the process smoothly.
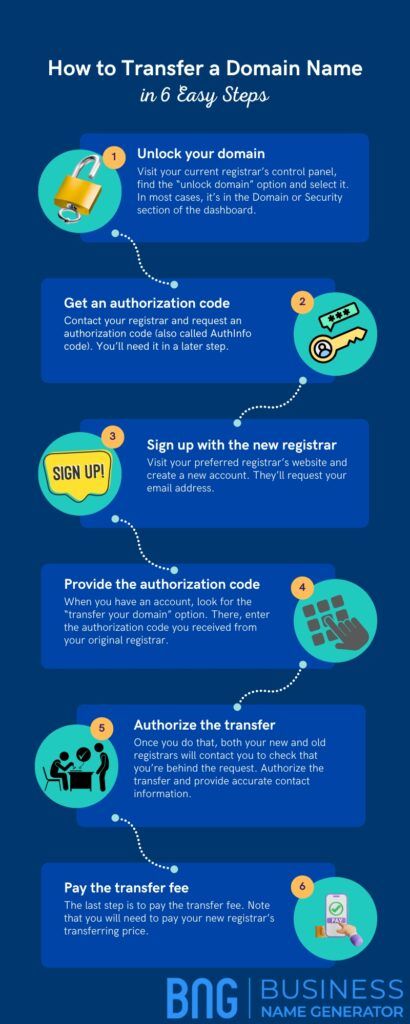
Step 1: Unlock Your Domain
The first step in transferring your domain name is to unlock it with your current registrar. This can usually be done through your account dashboard or by contacting customer support. By unlocking your domain, you are allowing it to be transferred to a new registrar.
Step 2: Obtain the Authorization Code
Next, you will need to obtain an authorization code from your current registrar. This code is like a password that authorizes the transfer of your domain name to a new registrar. You can usually find this code within your account settings or by requesting it from customer support.
Step 3: Choose a New Registrar
Before initiating the transfer, you will need to choose a new registrar to transfer your domain name to. Research different registrars to find one that offers the services and pricing that meet your needs. Once you have selected a new registrar, you can begin the transfer process.
Step 4: Initiate the Transfer
To initiate the transfer, you will need to provide the authorization code to your new registrar. This code verifies that you are the rightful owner of the domain name and authorizes the transfer. You will also need to pay a transfer fee to complete the process.
Step 5: Confirm the Transfer
After providing the authorization code and paying the transfer fee, your new registrar will begin the transfer process. You may receive an email confirming the transfer and providing any additional steps or information needed to complete the process. Make sure to follow these instructions carefully to ensure a successful transfer.
Step 6: Verify the Transfer
Once the transfer is complete, you should verify that your domain name has been successfully transferred to your new registrar. You can do this by checking your account settings or contacting customer support. It may take up to a few days for the transfer to be fully processed and completed.
Step 7: Update Your DNS Records
After the transfer is complete, you will need to update your DNS records with your new registrar. This will ensure that your domain name is properly linked to your website and other online services. You can usually update your DNS records through your account dashboard or by contacting customer support.
Conclusion
Transferring a domain name between registrars may seem like a daunting task, but by following these steps, you can ensure a smooth and successful transfer process. Remember to unlock your domain, obtain the authorization code, choose a new registrar, initiate the transfer, confirm the transfer, verify the transfer, and update your DNS records. With careful planning and attention to detail, you can make the transfer process quick and easy.